SAPIEN assets and rendering
In this tutorial, you will learn the following:
Download SAPIEN asset in Python and load it into sapien.
Setup customized camera in simulation scene.
Off-screen rendering for RGB, depth, segmentation and point cloud.
This tutorial will focus on how to download SAPIEN assets in Python and perform off-screen rendering.
Get your unique access token
In order to download the SAPIEN assets, your need to fist register on SAPIEN website,
When logging in, you can see the Generate Python Access Token on the Download page.

Generate your unique access token which will be used later in your Python script to download the data.
Download SAPIEN assets in Python
Download SAPIEN assets is really simple in Python, you can directly get the URDF file from SAPIEN server.
8 9 10 | my_token = "Change This to Your Access Token"
sapien_assets_id = 179
urdf = download_partnet_mobility(sapien_assets_id, token=my_token)
|
Warning
The generated token can only be used for the unique IP address. If you are working with dynamic IP, it is recommended to download the whole dataset before use.
OpenGL vs Vulkan
SAPIEN now supports Vulkan for rendering, and we plan to move away from OpenGL. Vulkan has the advantage of “truly” off-screen. Unlike OpenGL, it does not require x-server to render, so it is easier to set up on servers. And unlike OpenGL, Vulkan will not mess with other packages that requires on-screen display such as matplotlib, making SAPIEN more compatible with other packages. However, it does have some limitations, one being not able to use CPU to render (but if you are really using CPU OpenGL, you should probably stop and get a GPU).
Note
The following sections will be written for the Vulkan-based renderer. If you are looking for OpenGL, jump to sections marked “OpenGL, deprecated”.
Vulkan environment setup
Before any rendering, you need to check several things.
Make sure you are using Linux.
Make sure your Vulkan icd file is present by looking at
ls /usr/share/vulkan/icd.d. For example, if you are using Nvidia, you should seenvidia_icd.jsonin this directory. If not, you need to install a Vulkan-compatible GPU driver. If you are using AMD or Intel GPU, you will see similar icd files.Set the environment variable to tell Vulkan to use a proper GPU. For example, to tell Vulkan to use your Nvidia GPU, run
export VK_ICD_FILENAMES=/usr/share/vulkan/icd.d/nvidia_icd.jsonin your shell environment. You may consider adding this line to your.bashrcor.zshrcfile.
Create Camera in Simulation Scene
Before creating a camera, make some preparation like before.
12 13 14 15 16 17 18 19 20 21 22 | sim = sapien.Engine()
renderer = sapien.VulkanRenderer(True)
sim.set_renderer(renderer)
scene = sim.create_scene()
scene.set_timestep(1 / 60)
scene.set_ambient_light([0.5, 0.5, 0.5])
scene.set_shadow_light([0, 1, -1], [0.5, 0.5, 0.5])
scene.add_point_light([1, 2, 2], [1, 1, 1])
scene.add_point_light([1, -2, 2], [1, 1, 1])
scene.add_point_light([-1, 0, 1], [1, 1, 1])
|
We use sapien.VulkanRenderer(offscree_only) to create the Vulkan-based
renderer. Passing in True for the argument will disable on-screen display,
and it will work without a window server such as an x-server. You can forget
about all the difficulties working with x-server and OpenGL!
Next, you need to create a camera and place it at the right place as follows:
24 25 26 27 28 29 30 31 32 33 34 35 36 | near, far = 0.1, 100
camera_mount_actor = scene.create_actor_builder().build(is_kinematic=True)
camera = scene.add_mounted_camera('first_camera', camera_mount_actor, Pose(), 640, 480, np.deg2rad(35),
np.deg2rad(35), near, far)
pos = np.array([-2, -2, 3])
forward = -pos / np.linalg.norm(pos)
left = np.cross([0, 0, 1], forward)
left = left / np.linalg.norm(left)
up = np.cross(forward, left)
mat44 = np.eye(4)
mat44[:3, :3] = np.linalg.inv(np.array([forward, left, up]))
mat44[:3, 3] = pos
|
Camera should be placed on an Actor, which is an object in the scene.
If the actor is moving during simulation, the camera will move accordingly.
Thus by setting the position and orientation of the mounted actor, we could set the pose of camera.
Note
Note that the coordinate convention for SAPIEN is different from other graphics software, in order to match the robotics convention. The forward direction is x, y for left and z for up.
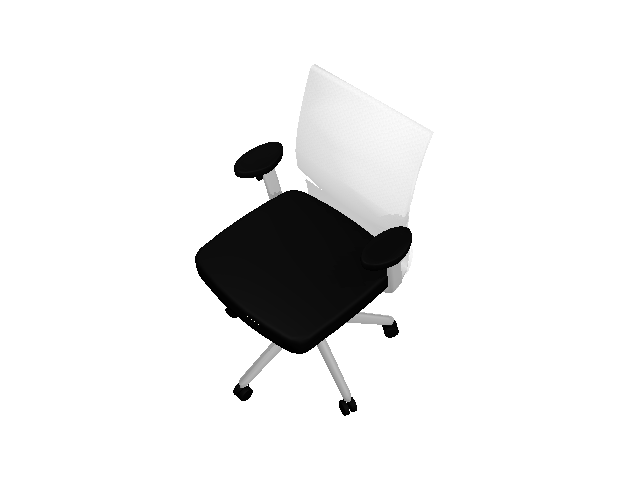
Rendering RGB Image
To render a RGB image using the offscreen renderer, we may first to step simulation to make everything set.
To run the code below, you may need to install pillow
by pip install pillow.
53 54 55 56 57 58 59 60 | scene.step()
scene.update_render()
camera.take_picture()
rgba = camera.get_color_rgba()
rgba = (rgba * 255).clip(0, 255).astype("uint8")
rgba = Image.fromarray(rgba)
rgba.save("color.png")
|
This will save a color.png in your workspace as follows:
Generate viewed Point Cloud
Point cloud is a convenient representation of the 3D scene. The following code shows how to get the camera-space point cloud in SPAIEN.
Note in the camera space, we use the graphics convention of y up and -z forward. Line 66 and 67 show how we convert it to z up and x forward.
62 63 64 65 66 67 68 | depth = camera.get_depth()
y, x = np.where(depth < 1)
points = camera.get_position_rgba()[depth != 1]
points[..., 3] = 1
points[..., [0, 1, 2]] = points[..., [2, 0, 1]]
points[..., [0, 1]] *= -1
points = (mat44 @ points.T).T[:, :3]
|
Visualize object segmentation
SAPIEN assets is build upon the PartNet Dataset, which provides
part level segmentation for objects. To run the code below, install Open3D
first by pip install open3d.
70 71 72 73 74 75 76 77 78 79 | cloud = open3d.geometry.PointCloud()
cloud.points = open3d.utility.Vector3dVector(points)
obj_segmentation = camera.get_obj_segmentation()[y, x]
color_map = (
np.array([ImageColor.getrgb(color) for color in ImageColor.colormap.keys()]) / 255
)
cloud.colors = open3d.utility.Vector3dVector(color_map[obj_segmentation])
open3d.io.write_point_cloud("cloud.pcd", cloud)
open3d.visualization.draw_geometries([cloud])
|
You will see the visualization from birdview. Use mouse to change the view and press
Q on the keyboard to quit the visualization.

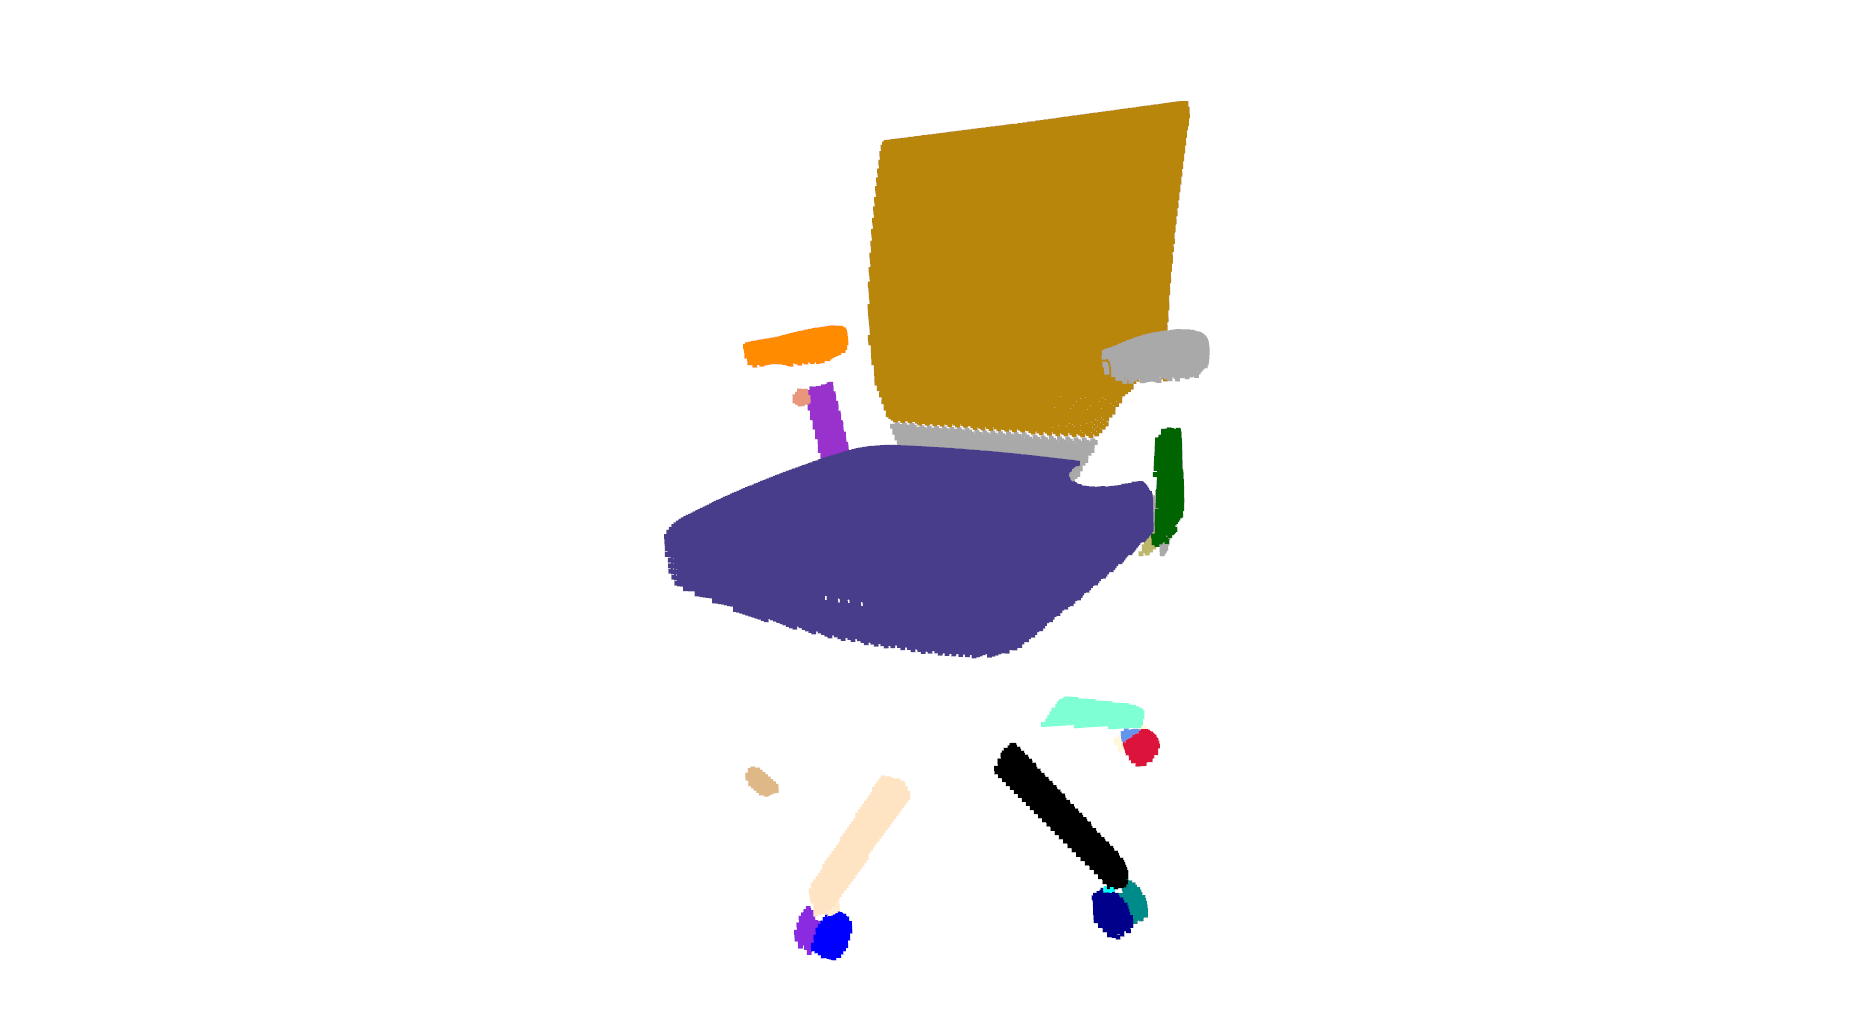
Besides get_color_rgba, get_obj_segmentation, get_position_rgba and get_depth, SAPIEN camera also provides get_normal_rgba()
and get_segmentaion() and get_albedo_rgba(). The object segmentation is mesh level segmentation where segmentation is
actor level. get_obj_segmentation is often more fine-grained than get_segmentation.
The entire code
1 2 3 4 5 6 7 8 9 10 11 12 13 14 15 16 17 18 19 20 21 22 23 24 25 26 27 28 29 30 31 32 33 34 35 36 37 38 39 40 41 42 43 44 45 46 47 48 49 50 51 52 53 54 55 56 57 58 59 60 61 62 63 64 65 66 67 68 69 70 71 72 73 74 75 76 77 78 79 80 81 | import sapien.core as sapien
from sapien.core import Pose
import numpy as np
from PIL import Image, ImageColor
import open3d
from sapien.asset import download_partnet_mobility
my_token = "Your Access Token"
sapien_assets_id = 179
urdf = download_partnet_mobility(sapien_assets_id, token=my_token)
sim = sapien.Engine()
renderer = sapien.VulkanRenderer(True)
sim.set_renderer(renderer)
scene = sim.create_scene()
scene.set_timestep(1 / 60)
scene.set_ambient_light([0.5, 0.5, 0.5])
scene.set_shadow_light([0, 1, -1], [0.5, 0.5, 0.5])
scene.add_point_light([1, 2, 2], [1, 1, 1])
scene.add_point_light([1, -2, 2], [1, 1, 1])
scene.add_point_light([-1, 0, 1], [1, 1, 1])
near, far = 0.1, 100
camera_mount_actor = scene.create_actor_builder().build(is_kinematic=True)
camera = scene.add_mounted_camera(
"first_camera",
camera_mount_actor,
Pose(),
640,
480,
np.deg2rad(35),
np.deg2rad(35),
near,
far,
)
pos = np.array([-2, -2, 3])
forward = -pos / np.linalg.norm(pos)
left = np.cross([0, 0, 1], forward)
left = left / np.linalg.norm(left)
up = np.cross(forward, left)
mat44 = np.eye(4)
mat44[:3, :3] = np.array([forward, left, up]).T
mat44[:3, 3] = pos
camera_mount_actor.set_pose(Pose.from_transformation_matrix(mat44))
loader = scene.create_urdf_loader()
loader.fix_root_link = 1
asset = loader.load_kinematic(urdf)
assert asset, "No SAPIEN asset is loaded"
scene.step()
scene.update_render()
camera.take_picture()
rgba = camera.get_color_rgba()
rgba = (rgba * 255).clip(0, 255).astype("uint8")
rgba = Image.fromarray(rgba)
rgba.save("color.png")
depth = camera.get_depth()
y, x = np.where(depth < 1)
points = camera.get_position_rgba()[depth != 1]
points[..., 3] = 1
points[..., [0, 1, 2]] = points[..., [2, 0, 1]]
points[..., [0, 1]] *= -1
points = (mat44 @ points.T).T[:, :3]
cloud = open3d.geometry.PointCloud()
cloud.points = open3d.utility.Vector3dVector(points)
obj_segmentation = camera.get_obj_segmentation()[y, x]
color_map = (
np.array([ImageColor.getrgb(color) for color in ImageColor.colormap.keys()]) / 255
)
cloud.colors = open3d.utility.Vector3dVector(color_map[obj_segmentation])
open3d.io.write_point_cloud("cloud.pcd", cloud)
open3d.visualization.draw_geometries([cloud])
scene = None
|
Warning
The following sections talks about the deprecated OpenGL renderer. You do not need to read if you do not intend to use OpenGL.
Create Camera in Simulation Scene (OpenGL, deprecated)
Before create a camera, make some preparation like before.
12 13 14 15 16 17 18 19 20 21 22 | sim = sapien.Engine()
renderer = sapien.OptifuserRenderer()
sim.set_renderer(renderer)
scene = sim.create_scene()
scene.set_timestep(1 / 60)
scene.set_ambient_light([0.5, 0.5, 0.5])
scene.set_shadow_light([0, 1, -1], [0.5, 0.5, 0.5])
scene.add_point_light([1, 2, 2], [1, 1, 1])
scene.add_point_light([1, -2, 2], [1, 1, 1])
scene.add_point_light([-1, 0, 1], [1, 1, 1])
|
For offscreen rendering without real-time visualization, you do not need to create a RendererController.
However, you need to create some cameras and place them at the right place as follow:
25 26 27 28 29 30 31 32 33 34 35 36 37 | camera_mount_actor = scene.create_actor_builder().build(is_kinematic=True)
camera = scene.add_mounted_camera('first_camera', camera_mount_actor, Pose(), 640, 480, np.deg2rad(35),
np.deg2rad(35), near, far)
pos = np.array([-2, -2, 3])
forward = -pos / np.linalg.norm(pos)
left = np.cross([0, 0, 1], forward)
left = left / np.linalg.norm(left)
up = np.cross(forward, left)
mat44 = np.eye(4)
mat44[:3, :3] = np.linalg.inv(np.array([forward, left, up]))
mat44[:3, 3] = pos
camera_mount_actor.set_pose(Pose.from_transformation_matrix(mat44))
|
Camera should be placed on an Actor, which is a object contained in the scene.
If the actor is moving during simulation, the camera will move accordingly.
Thus by setting the position and orientation of the mounted actor, we could set the pose of camera.
Note
Note that the coordinate convention for SAPIEN is different from other graphics software, in order to match the robotics convention. The forward direction is x, y for left and z for up.
Rendering RGB Image (OpenGL, deprecated)
To render a RGB image using the offscreen renderer, we may first to step simulation to make everything set.
To run the code below, you may need to install pillow
by pip install pillow.
44 45 46 47 48 49 50 51 | scene.step()
scene.update_render()
camera.take_picture()
rgba = camera.get_color_rgba()
rgba = (rgba * 255).clip(0, 255).astype('uint8')
rgba = Image.fromarray(rgba)
rgba.save('color.png')
|
This will save a color.png in your workspace as follow:
Generate viewed Point Cloud (OpenGL, deprecated)
Point cloud is a convenient representation of the 3D scene. The following code shows how to get the point
cloud in SPAIEN. The get_depth() function will not return the real depth value but a OpenGL depth buffer
instead. The relation between OpenGL depth buffer is given below:
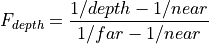
, where  is the OpenGL buffer and depth is real value of depth.
53 54 55 56 57 58 59 60 61 62 63 | camera_matrix = camera.get_camera_matrix()[:3, :3]
opengl_depth = camera.get_depth()
y, x = np.where(opengl_depth < 1)
z = near * far / (far + opengl_depth * (near - far))
permutation = np.array([[0, 0, 1], [-1, 0, 0], [0, -1, 0]])
points = (permutation @ np.dot(np.linalg.inv(camera_matrix),
np.stack([x, y, np.ones_like(x)] * z[y, x], 0))).T
# Transform from camera coordinate to world coordinate
points = np.concatenate([points, np.ones([points.shape[0], 1])], axis=1)
points = (mat44 @ points.T).T[:, :3]
|
Visualize object segmentation (OpenGL, deprecated)
SAPIEN assets is build upon the PartNet Dataset, which provides
part level segmentation for objects. To run the code below, install Open3D
first by pip install open3d.
65 66 67 68 69 70 71 72 | cloud = open3d.geometry.PointCloud()
cloud.points = open3d.utility.Vector3dVector(points)
obj_segmentation = camera.get_obj_segmentation()[y, x]
color_map = np.array([ImageColor.getrgb(color) for color in ImageColor.colormap.keys()]) / 255
cloud.colors = open3d.utility.Vector3dVector(color_map[obj_segmentation])
open3d.io.write_point_cloud('cloud.pcd', cloud)
open3d.visualization.draw_geometries([cloud])
|
You will see the visualization from birdview. Use mouse to change the view and press
Q on the keyboard to quit the visualization.
Besides get_color_rgba(), get_obj_segmentation() and get_depth, SAPIEN camera also provides get_normal_rgba()
and get_segmentaion() and get_albedo_rgba(). The object segmentation is mesh level segmentation where segmentation is
actor level. get_obj_segmentation is often more fine-grained than get_segmentation.
The entire code (OpenGL, deprecated)
1 2 3 4 5 6 7 8 9 10 11 12 13 14 15 16 17 18 19 20 21 22 23 24 25 26 27 28 29 30 31 32 33 34 35 36 37 38 39 40 41 42 43 44 45 46 47 48 49 50 51 52 53 54 55 56 57 58 59 60 61 62 63 64 65 66 67 68 69 70 71 72 73 74 | import sapien.core as sapien
from sapien.core import Pose
import numpy as np
from PIL import Image, ImageColor
import open3d
from sapien.asset import download_partnet_mobility
my_token = "Change This to Your Access Token"
sapien_assets_id = 179
urdf = download_partnet_mobility(sapien_assets_id, token=my_token)
sim = sapien.Engine()
renderer = sapien.OptifuserRenderer()
sim.set_renderer(renderer)
scene = sim.create_scene()
scene.set_timestep(1 / 60)
scene.set_ambient_light([0.5, 0.5, 0.5])
scene.set_shadow_light([0, 1, -1], [0.5, 0.5, 0.5])
scene.add_point_light([1, 2, 2], [1, 1, 1])
scene.add_point_light([1, -2, 2], [1, 1, 1])
scene.add_point_light([-1, 0, 1], [1, 1, 1])
near, far = 0.1, 100
camera_mount_actor = scene.create_actor_builder().build(is_kinematic=True)
camera = scene.add_mounted_camera('first_camera', camera_mount_actor, Pose(), 640, 480, np.deg2rad(35),
                                  np.deg2rad(35), near, far)

pos = np.array([-2, -2, 3])
forward = -pos / np.linalg.norm(pos)
left = np.cross([0, 0, 1], forward)
left = left / np.linalg.norm(left)
up = np.cross(forward, left)
mat44 = np.eye(4)
mat44[:3, :3] = np.linalg.inv(np.array([forward, left, up]))
mat44[:3, 3] = pos
camera_mount_actor.set_pose(Pose.from_transformation_matrix(mat44))
loader = scene.create_urdf_loader()
loader.fix_root_link = 1
asset = loader.load_kinematic(urdf)
assert asset, "No SAPIEN asset is loaded"
scene.step()
scene.update_render()
camera.take_picture()

rgba = camera.get_color_rgba()
rgba = (rgba * 255).clip(0, 255).astype('uint8')
rgba = Image.fromarray(rgba)
rgba.save('color.png')
camera_matrix = camera.get_camera_matrix()[:3, :3]
opengl_depth = camera.get_depth()
y, x = np.where(opengl_depth < 1)
z = near * far / (far + opengl_depth * (near - far))
permutation = np.array([[0, 0, 1], [-1, 0, 0], [0, -1, 0]])
points = (permutation @ np.dot(np.linalg.inv(camera_matrix),
                               np.stack([x, y, np.ones_like(x)] * z[y, x], 0))).T

# Transform from camera coordinate to world coordinate
points = np.concatenate([points, np.ones([points.shape[0], 1])], axis=1)
points = (mat44 @ points.T).T[:, :3]
cloud = open3d.geometry.PointCloud()
cloud.points = open3d.utility.Vector3dVector(points)
obj_segmentation = camera.get_obj_segmentation()[y, x]
color_map = np.array([ImageColor.getrgb(color) for color in ImageColor.colormap.keys()]) / 255
cloud.colors = open3d.utility.Vector3dVector(color_map[obj_segmentation])

open3d.io.write_point_cloud('cloud.pcd', cloud)
open3d.visualization.draw_geometries([cloud])
scene = None
|