Raytracing Renderer
In this tutorial, you will learn the following:
Use of raytracing-based backend Kuafu
The full script can be downloaded from kuafu.py, kuafu_mat.py, and kuafu_sensor.py
Raytracing vs. rasterization
In the previous tutorials, we have learned how to set up a basic scene with SAPIEN and acquire rendering results with VulkanRenderer. The VulkanRenderer is a high-efficiency rasterization-based renderer, making it suitable for data-intensive tasks such as reinforcement learning.
However, though fast, the rasterization-based renderer is not physically-grounded, cannot render many real-world effects e.g. indirect lighting, realistic shadows, reflections and refractions, making the results overly flat and lack realism. On the other end, raytracing renderer simulates how rays interact with objects in a physically correct manner, and produces images that can be indistinguishable from those captured by a camera.
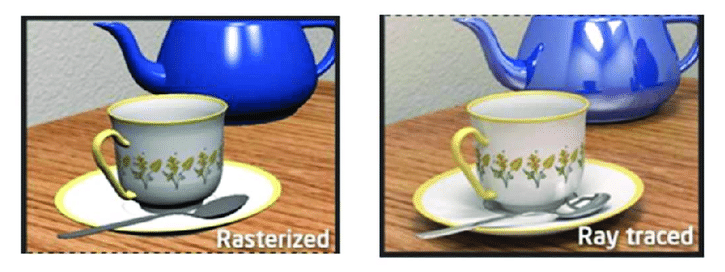
From A Shader-Based Ray Tracing Engine, Park et al.
Raytracing with SAPIEN
SAPIEN 2.0 ships with a raytracing renderer backend, named Kuafu (KuafuRenderer). Switching to Kuafu is easy, in the previous camera example, we set up the renderer with:
renderer = sapien.VulkanRenderer()
To use Kuafu instead of the rasterization renderer, simply replace the line with:
renderer = sapien.KuafuRenderer()
That’s it! You can now rerun the script with raytracing renderer. The result would look like:
Note
The Kuafu backend currently (2.0a) only supports Color downloading. Trying to download Position and other data from the camera will fail.
The Kuafu backend does not feature full support for viewers. It is recommended to debug and build scene with VulkanRenderer and produce the final results with KuafuRenderer.
You may find that the result looks more realistic with the raytracing renderer. However the result contains noise due to under-sampling. To reduce the noise, one way is increasing the sample-per-pixel (spp) for the renderer. To achieve this, we can pass a KuafuConfig object when creating the renderer:
render_config = sapien.KuafuConfig()
renderer_config.spp = 256
renderer = sapien.KuafuRenderer(render_config)
Increasing the spp will affect the rendering speed directly. A cheaper way to reduce the noise is using a denoiser. Kuafu features an OptiX denoiser by NVIDIA. To enable the denoiser, we can set the use_denoiser flag in the config:
render_config = sapien.KuafuConfig()
renderer_config.spp = 64
renderer_config.use_denoiser = True
renderer = sapien.KuafuRenderer(render_config)
Note
You are required to have an NVIDIA GPU with driver version > 470 installed to use the denoiser.
Advanced Material Support in Kuafu
To demonstrate the diverse material support in Kuafu. We will create a scene in SAPIEN and render with both VulkanRenderer and KuafuRenderer. First, let’s setup the environment:
    use_kuafu = False

    sim = sapien.Engine()
    sim.set_log_level('warning')
    sapien.KuafuRenderer.set_log_level('warning')

    if use_kuafu:
        render_config = sapien.KuafuConfig()
        render_config.use_viewer = False
        render_config.spp = 32
        render_config.max_bounces = 8
        render_config.use_denoiser = True
        renderer = sapien.KuafuRenderer(render_config)
    else:
        renderer = sapien.VulkanRenderer()

    sim.set_renderer(renderer)

    scene_config = sapien.SceneConfig()
    scene = sim.create_scene(scene_config)

    camera_mount = scene.create_actor_builder().build_kinematic()
    camera = scene.add_mounted_camera(
        name="camera",
        actor=camera_mount,
        pose=sapien.Pose(),  # relative to the mounted actor
        width=1280,
        height=720,
        fovy=np.deg2rad(45),
        near=0.1,
        far=100,
    )

    camera_mount.set_pose(
        Pose([-0.28, -0.28, 0.46], [0.8876263, -0.135299, 0.3266407, 0.2951603]))

    ground_material = renderer.create_material()
    ground_material.base_color = np.array([202, 164, 114, 256]) / 256
    ground_material.specular = 0.5
    scene.add_ground(0, render_material=ground_material)
    scene.set_timestep(1 / 240)

    scene.set_ambient_light([0.3, 0.3, 0.3])
    scene.add_directional_light([0, 0.5, -1], color=[3.0, 3.0, 3.0])
We add a flag use_kuafu to allow easy switching between VulkanRenderer and KuafuRenderer. Next, let’s build the scene. First, we create a rough bluish sphere:
    builder = scene.create_actor_builder()
    material = renderer.create_material()
    material.base_color = [0.2, 0.2, 0.8, 1.0]
    material.roughness = 0.5
    material.metallic = 0.0
    builder.add_sphere_visual(radius=0.06, material=material)
    builder.add_sphere_collision(radius=0.06)
    sphere1 = builder.build()
    sphere1.set_pose(Pose(p=[-0.05, 0.05, 0.06]))
Next, we create a transparent sphere:
    builder = scene.create_actor_builder()
    material = renderer.create_material()
    material.ior = 1.4
    material.transmission = 1.0
    material.base_color = [1.0, 1.0, 1.0, 1.0]
    material.roughness = 0.3
    material.metallic = 0.1
    builder.add_sphere_visual(radius=0.07, material=material)
    builder.add_sphere_collision(radius=0.07)
    sphere2 = builder.build()
    sphere2.set_pose(Pose(p=[0.05, -0.05, 0.07]))
Generally, setting a large transmission value will lead to a transparent material. Similarly, we can add a capsule and a box with advanced materials:
    builder = scene.create_actor_builder()
    material = renderer.create_material()
    material.base_color = [0.8, 0.7, 0.1, 1.0]
    material.roughness = 0.01
    material.metallic = 0.95
    builder.add_capsule_visual(radius=0.02, half_length=0.1, material=material)
    builder.add_capsule_collision(radius=0.02, half_length=0.1)
    cap = builder.build()
    cap.set_pose(Pose(p=[0.15, -0.01, 0.01], q=transforms3d.euler.euler2quat(0, 0, -0.7)))

    builder = scene.create_actor_builder()
    material = renderer.create_material()
    material.base_color = [0.8, 0.2, 0.2, 1.0]
    material.roughness = 0.005
    material.metallic = 0.7
    builder.add_box_visual(half_size=[0.09, 0.09, 0.09], material=material)
    builder.add_box_collision(half_size=[0.09, 0.09, 0.09])
    box = builder.build()
    box.set_pose(Pose(p=[0.05, 0.17, 0.09]))
Finally, let’s load an external mesh and assign a highly metallic material to that object:
    builder = scene.create_actor_builder()
    material = renderer.create_material()
    material.base_color = [0.9, 0.6, 0.5, 1.0]
    material.roughness = 0.0
    material.metallic = 0.9
    builder.add_visual_from_file(
        '../assets/objects/suzanne.dae', scale=[0.1, 0.1, 0.1], material=material)
    builder.add_box_collision(half_size=[0.1, 0.1, 0.1])
    box = builder.build()
    box.set_pose(Pose(p=[0.15, -0.25, 0.1], q=transforms3d.euler.euler2quat(0, 0, -1)))
After building the scene, we can get rendering results from the camera:
    scene.step()
    scene.update_render()
    camera.take_picture()

    rgb = camera.get_color_rgba()
    rgb = im.fromarray((rgb * 255).astype(np.uint8))
    rgb.save(f'mat_{"k" if use_kuafu else "v"}.png')
    rgb.show()

Result with VulkanRenderer
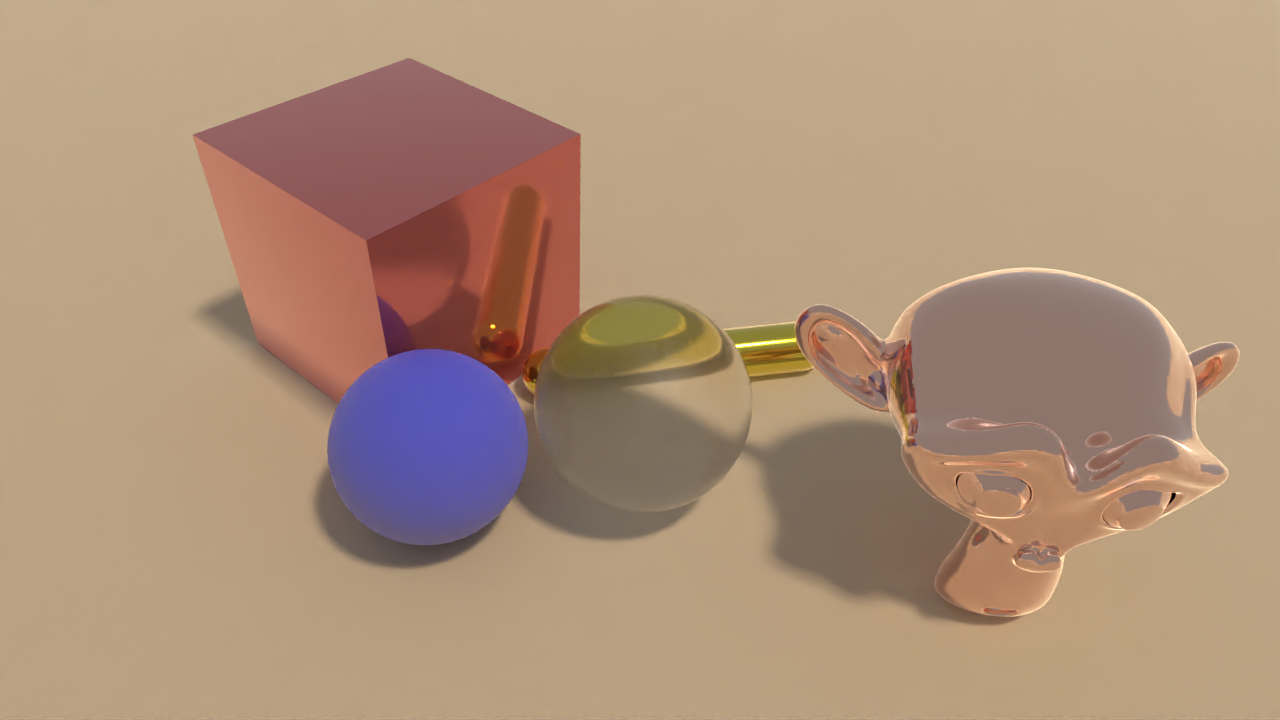
Result with KuafuRenderer
Sensor Simulation in Kuafu
Backed by realistic rendering. SAPIEN is able to simulate the full sensor pipeline and simulate realistic sensor depth. Starting from our previously built environment, let’s add a sensor to the scene:
from sapien.sensor import ActiveLightSensor
sensor = ActiveLightSensor('sensor', renderer, scene, sensor_type='fakesense_j415')
The ActiveLightSensor class has built-in sensor types such as fakesense_j415. We can also manually set all the sensor parameters by passing them to the class. Please check the API doc for details. The sensor behaves just like a mounted camera. You can set_pose, and take_picture on the sensor:
    sensor.set_pose(
        Pose([-0.28, -0.28, 0.46], [0.8876263, -0.135299, 0.3266407, 0.2951603]))

    scene.step()
    scene.update_render()
    sensor.take_picture()
After called take_picture. We can download RGB image, IR image, depth and point cloud from the sensor:
    rgb = sensor.get_rgb()
    im.fromarray((rgb * 255).astype(np.uint8)).show()

    ir_l, ir_r = sensor.get_ir()
    im.fromarray((ir_l * 255).astype(np.uint8)).show()
    im.fromarray((ir_r * 255).astype(np.uint8)).show()

    depth = sensor.get_depth()
    plt.imshow(depth)
    plt.show()
    plt.imsave('sensor_depth.png', depth)

    pc = sensor.get_pointcloud(frame='world', with_rgb=True)
    pc1 = o3d.geometry.PointCloud(o3d.utility.Vector3dVector(pc[..., :3]))
    pc1.colors = o3d.utility.Vector3dVector(pc[..., 3:])
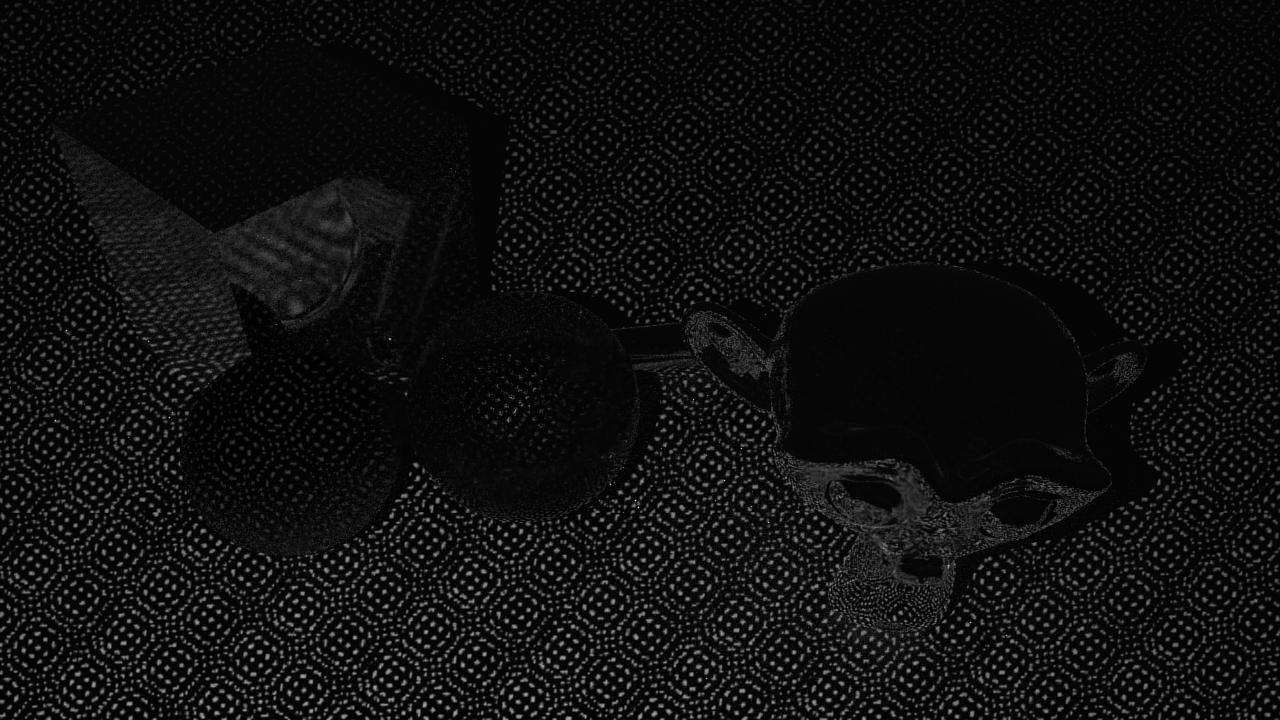
Simulated infra-red image from ActiveLightSensor.
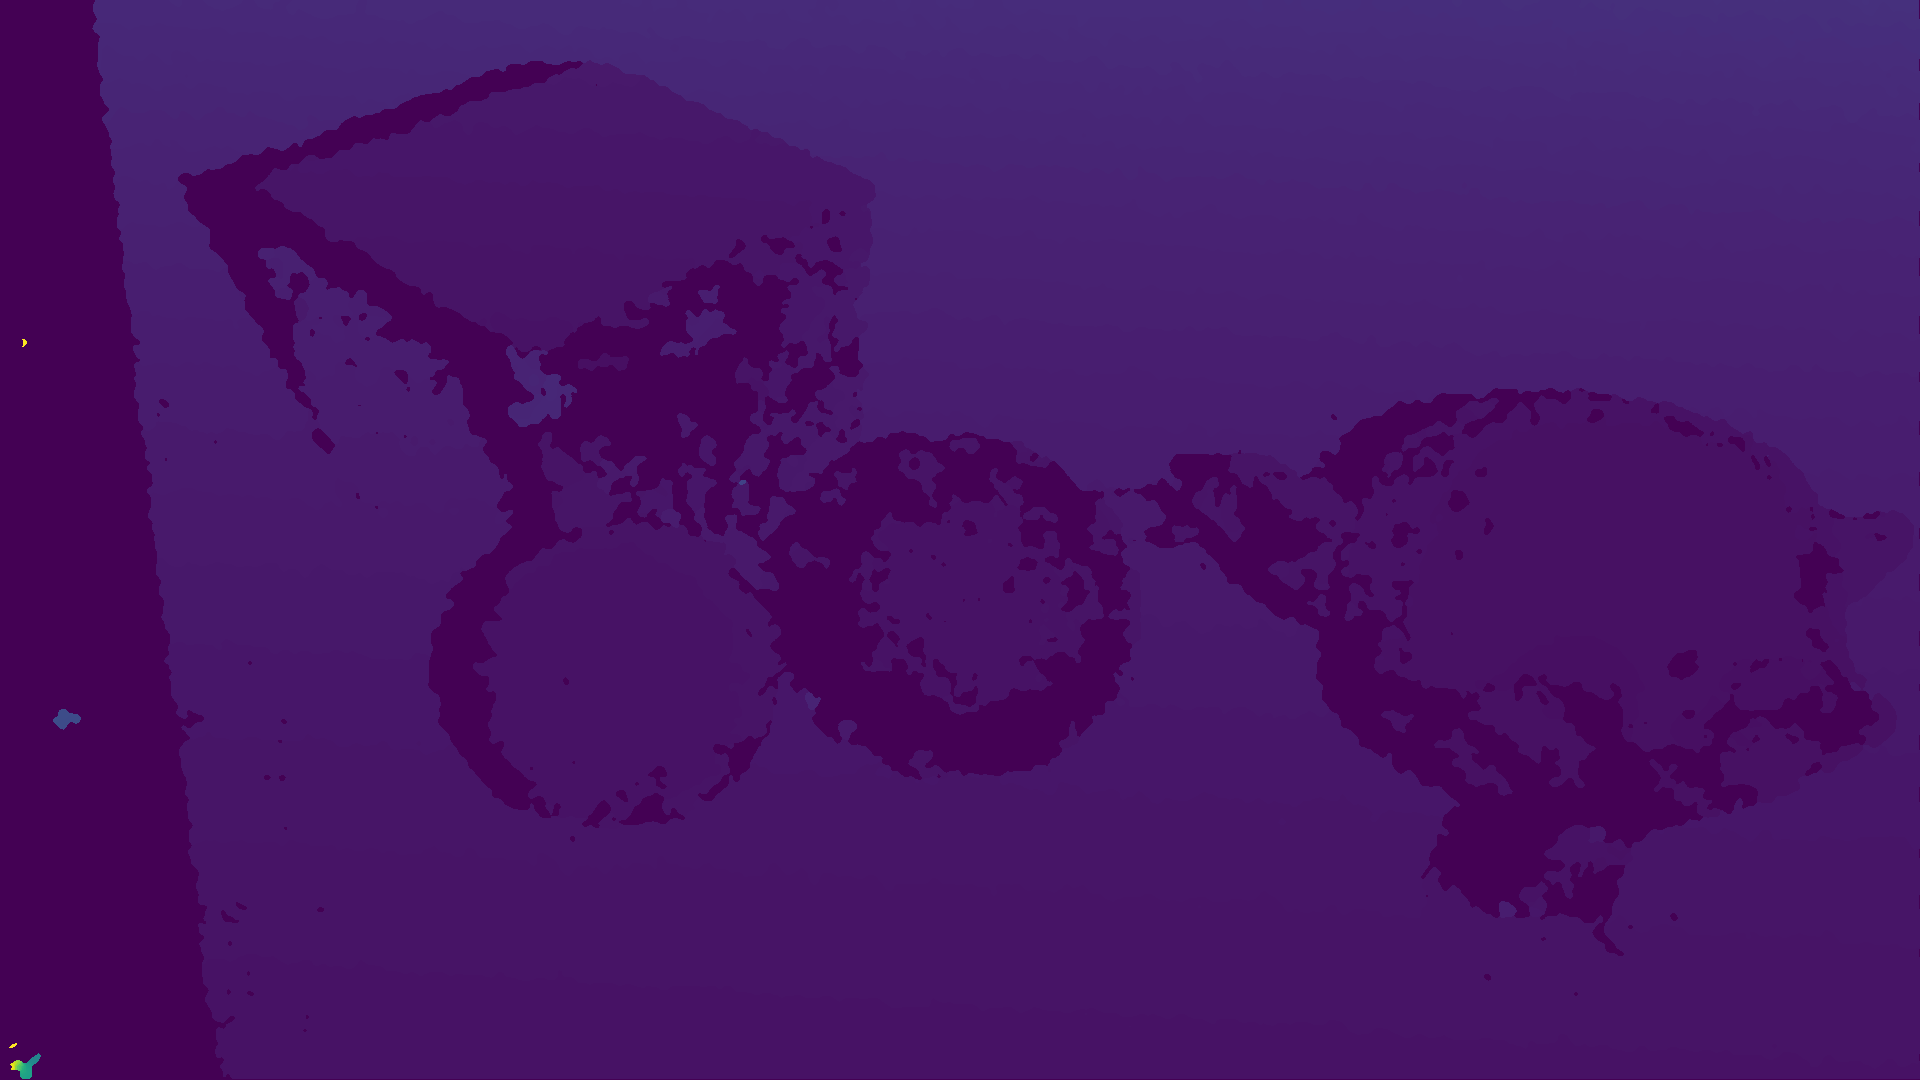
Simulated depth image from ActiveLightSensor.